Are you frustrated trying to teach your online classes through Zoom? Perhaps your simultaneous hybrid classes are driving you to breaking point. Google Classroom might be the answer you need. Here we’ll show you how to quickly get started teaching with Google classroom in our quick start Google Classroom Guide.
1. Sign up to Gmail
Teachers (but not students) need a Gmail account to get started with Google Classroom. When you sign up for Gmail you will be able to access all of the Google services such as Classroom, so if you don’t already have a Gmail account sign up right away.
2. Click the nine dots menu
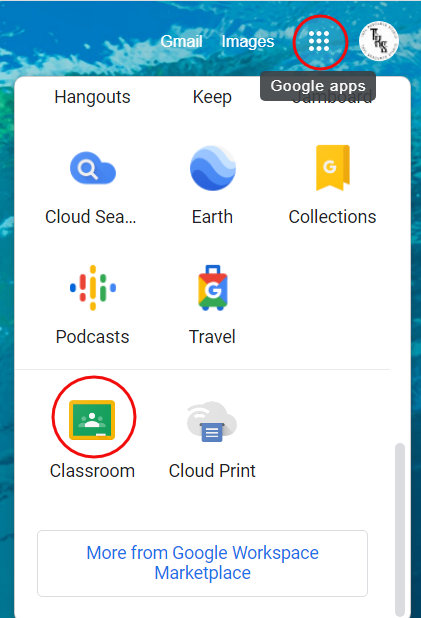
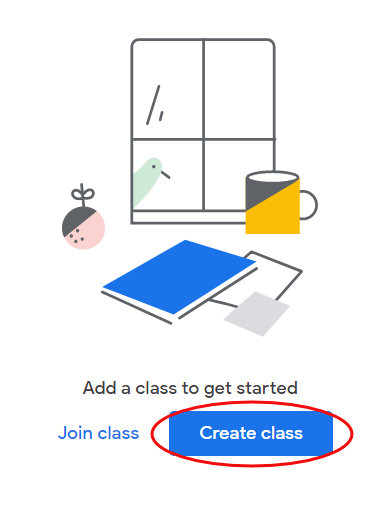
To open the Google Classroom App, first make sure you are logged into your Gmail account. Then go to the 9 dots icon in the top right of Google Chrome browser (see image). Scroll down the list of Apps until you find Google Classroom. You’ll be asked if you want to join a class or create a class. Choose ‘Create Class’. Choose a class name, subject, and add a room number if applicable. You can always come back and change these later by clicking on the ‘Settings’ gear icon.
3. Familiarize yourself with the layout
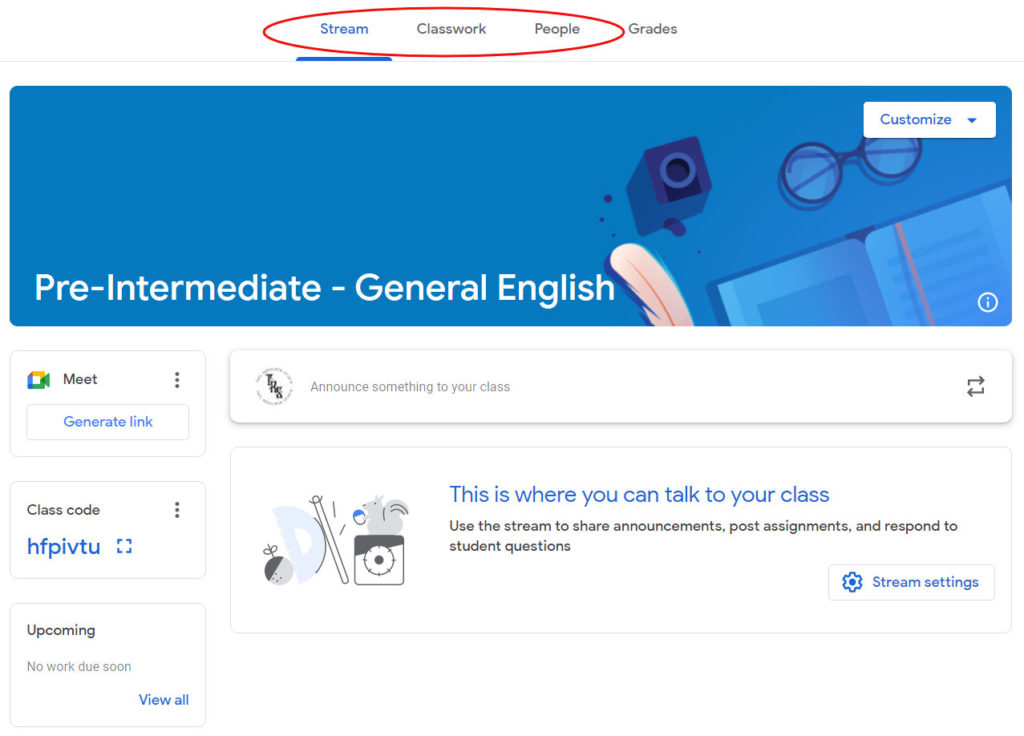
This is our main page. Take a look at the 4 tabs at the top: Stream, Classwork, People and Grades. The stream is where you’ll make announcements, and perhaps post your Zoom links if you are using Zoom. The Classwork tab is where you can create and post assignments. You can do this from the Stream tab too, but there are more options available under Classwork tab. The People tab is where you can add students and other teachers.
4. Change the theme
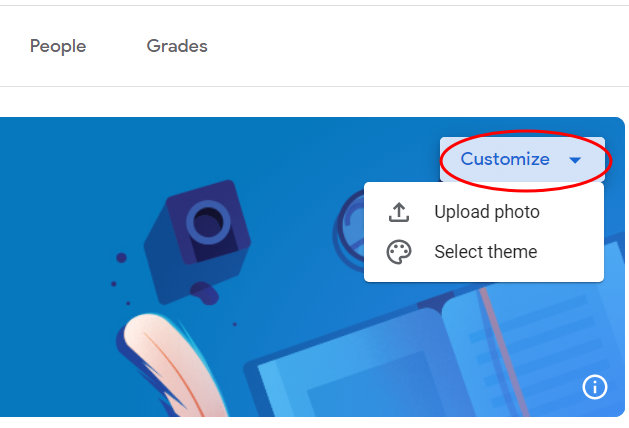
You will want to change your theme so that each class is easily identifiable to both you and your students who may have multiple classes in Google Classroom. Click the customize tab and either select a theme, or better yet, upload a photo.
5. Add students
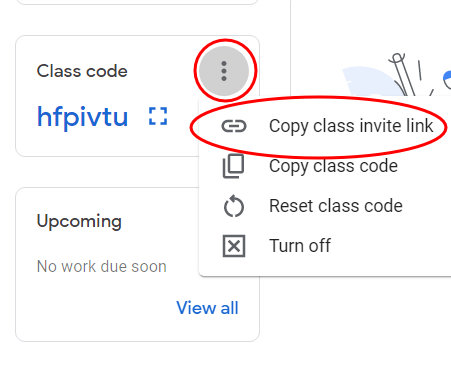
There are 3 different ways to add students in Google Classroom. If you have all their email addresses, click the ‘People’ tab, click ‘Add students’, then either type or copy and paste their email addresses. If you have a way to share a link with the students, then this might be the easiest way to add students. You can get the link in three places. Firstly, from the Stream page, in the box with Class Code, click the three dots icon, and click ‘copy class invite link’ (see image).
The second way is on the People tab, click add student, and then under ‘Invite link’ click the copy link icon. Alternatively, you can go to the settings menu (click the gear icon), under ‘General’ is an invite link that you can copy.

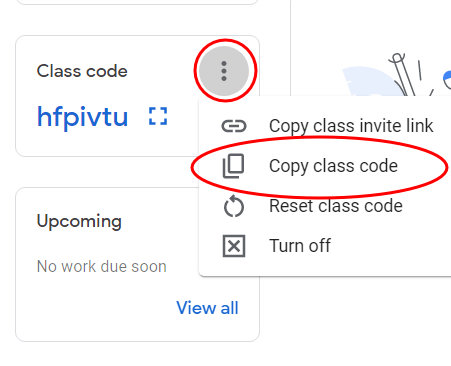
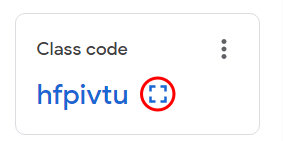
The third way to add students is to share a class code. Students must first go to Google Classroom, login with their email address, and click the ‘+’ sign to join a class. They then type in the class code. To share the code, go to the Stream tab, and in the box labelled Class Code, click the three dots icon, and click copy class code. However, you might want to display the class code. In which case, in the class code box, click the display icon (looks like 4 corners of a square) next to the class code.
6. Turn off comments
Before we go any further with our Google Classroom guide, we want to make sure we keep the stream page clutter free so that any announcements are clearly visible, and not buried under comments and assignments. To turn comments off, click on ‘Settings’ (gear icon) Under ‘General’ find where it says ‘Stream’ (see image). Then from the drop-down menu choose ‘only teachers can post or comment’. Don’t worry students can still post elsewhere for individual assignments.


7. Turn off assignments from the Stream
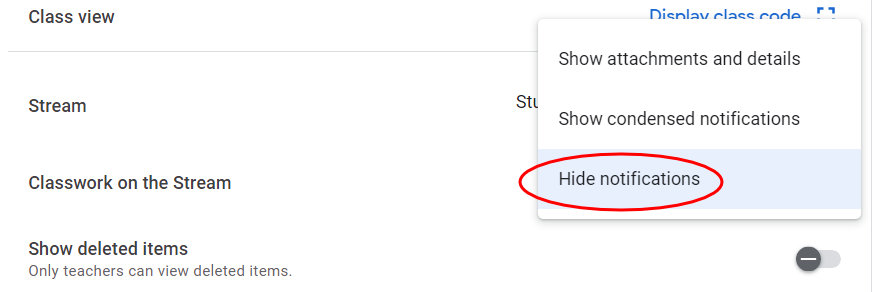
Following on from number 6, we’re going to turn assignments off so they don’t appear on the Stream. This is because we want students to get in the habit of going to the stream for announcements and to classwork for any assignments.

8. Post an announcement
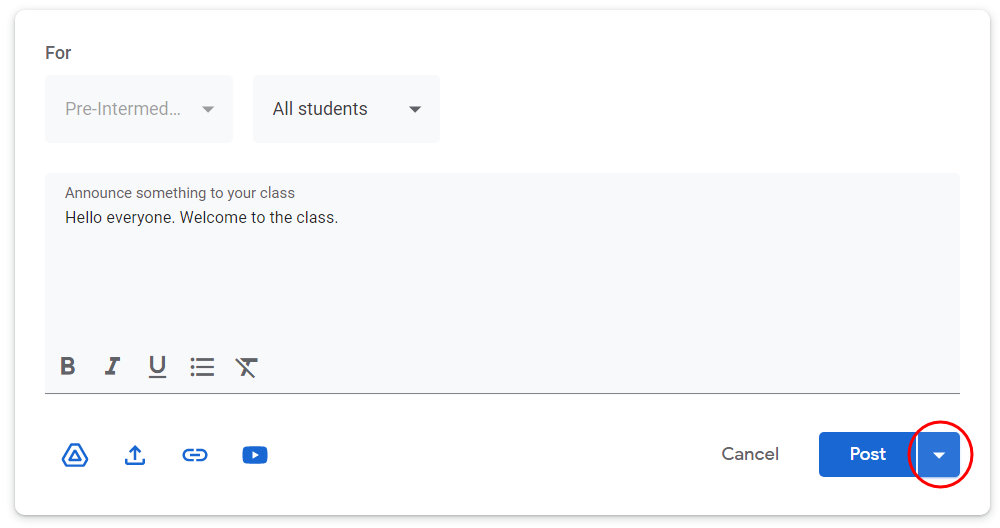
In the stream tab, click ‘announce something to your students’. You can make an announcement to all or just some of your students. You can also add files directly from google drive, add links or upload files. If you are ready to post now, click post. However, one of the really useful features of Google Classroom is that it gives you two more options. Firstly, you can schedule a post for a specific day and time. This is a great feature as you can set up all your posts in advance, and if disaster strikes and something goes wrong with Zoom, your microphone, your internet connection or whatever, your students will still get those announcements and assignments and be able to continue learning.
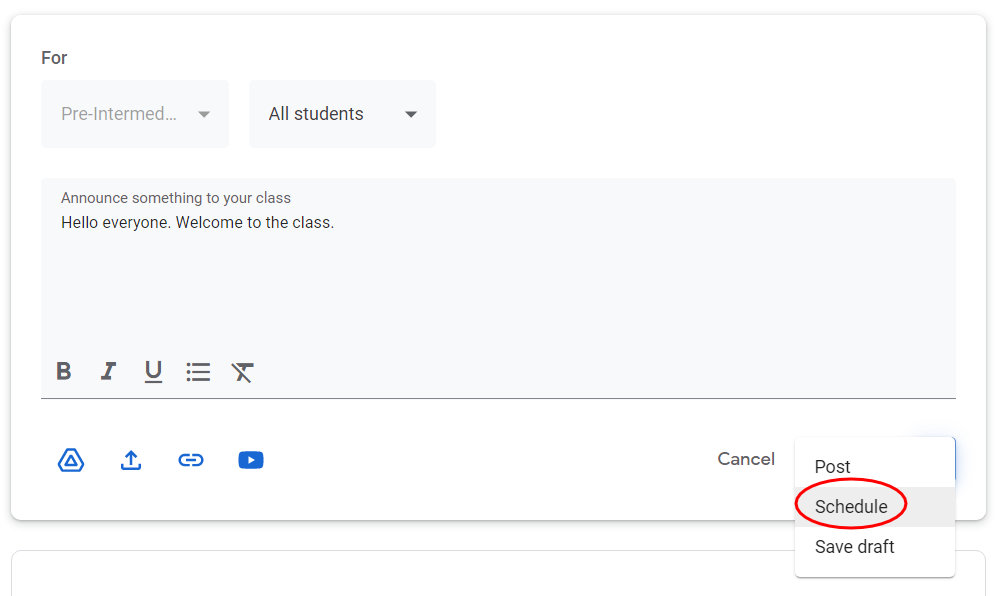
Another option is to save as a draft. Saving as a draft is particularly useful if you want more control over the release of materials during the class. For example, you have a document with the answers to exercises that you posted, but you don’t want to schedule the post, as you want to be sure all students have finished the exercises first before you give them the answers. Save your document as a draft, then in class when all students have finished, you can click publish.
9. Post an assignment
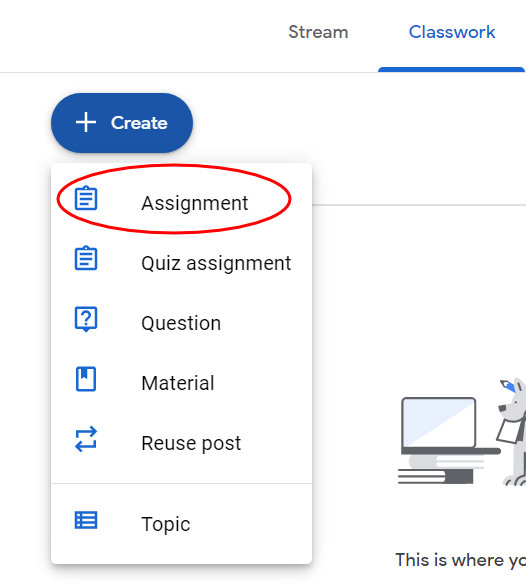
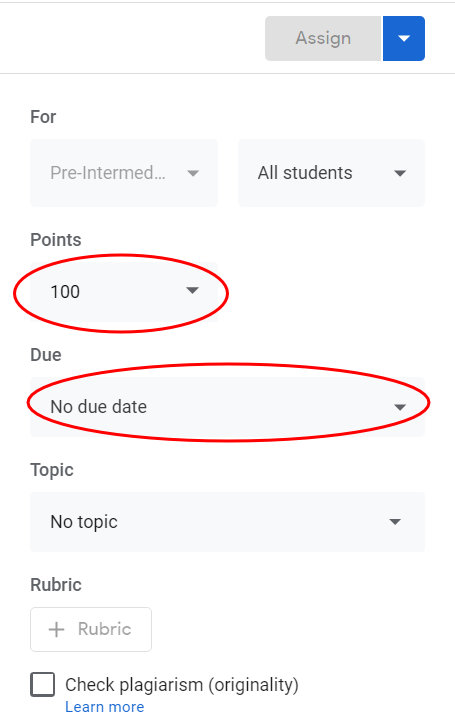
Let’s post an assignment from the Classwork Tab. Click ‘Create’, and choose ‘Assignment’. Making an assignment here is similar to doing in the Stream tab, but with a few more options. Go ahead and give your assignment a title, instructions, and attach a file. On the right of the screen, you have options to assign points. You can also choose a due date here. Finally, you can add a ‘Topic’ as a way to organize your lessons and materials.

10. Choose titles for topics carefully
For topics, it’s a good idea to plan ahead. Your Google Classroom courses can be archived, allowing you to reuse them over and over again in the future. Therefore, choose topics that will help organize you courses for future use. I suggest topic names such as lesson numbers or week numbers for future reference, and then add dates to make it clearer for your current students: ‘Lesson 1: 10th Jan – 14th Jan’ , or ‘Week 1: 10th Jan – 14th Jan’.
11. Make a copy for each student
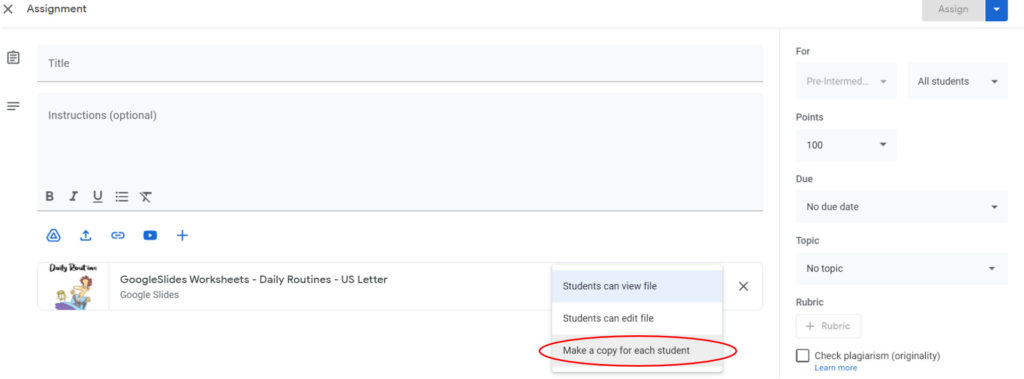
One of the main reasons for using Google Classroom is the ability to make a copy of a documents for each student. Otherwise, if you shared a document all students would be trying to edit the same document. Attach the document and click the dropdown ‘Students can view file’ and change t to ‘Make a copy for each student’. Google classroom will then make a copy of the document for each student in your class, and make a folder in your google drive where you can check their work.
12. Turn off email notifications
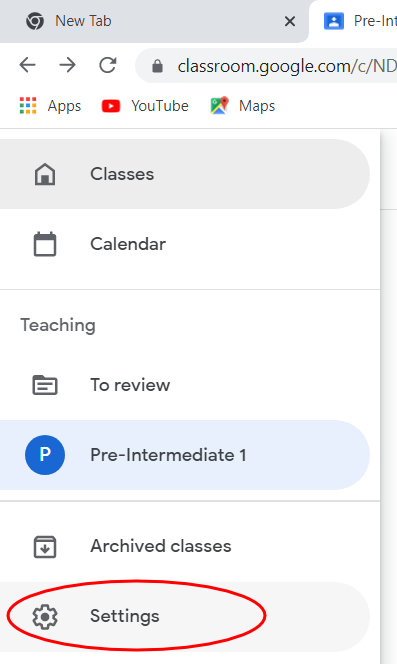
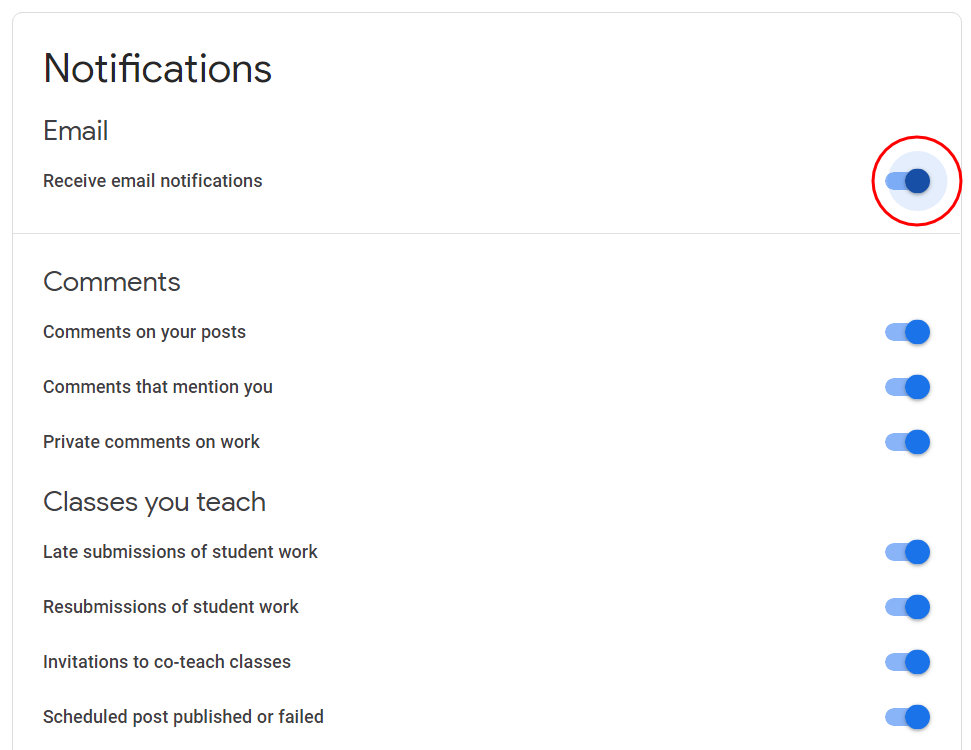
The final setting that we need to adjust is for email notifications. The default setting is ‘on’, so every time a student comments on a post, submits an assignment, or a scheduled post is published, you’ll receive an email. To turn some or all of the se settings off, go to the top left of the browser and next to the class name, click the three-lines (hamburger) menu icon. Choose ‘Settings’ at the bottom of the list. Now, you can turn off all or some of the email notification settings.
13. Download the App
There is also an App for Google Classroom, which you might find very useful. We’re not going to go into details here for our quick start Google Classroom guide, but it is worth downloading and experimenting with. I find it particularly useful for allowing me to publish any assignments that I have saved as a draft. If you are hybrid teaching, you can use it to monitor for comments while you are helping your face-to-face students. Download the App and see what else you can do with Google Classroom.
That’s all for our Google Classroom guide
That just about wraps up our quick start Google Classroom guide. There’s plenty more to say about Google Classroom, but the above guide will get you started with as few hiccups as possible. If you’re interested in more tech tips to help reduce frustration and improve your workflow, check out out Tech Tips for ESL Teachers. If you are looking for ESL resources to post on Google Classroom for your online or hybrid classes, we have some Google Slides Online Worksheets available on our Teachers Pay Teachers store.

